Showing posts with label DIY. Show all posts

DIY: make a bowl from a scratched unplayable record

We, (husband and I) collect records; given that these precious music recordings are often second hand and old, it is inevitable that at times we may get a record that is just too damaged to be playable.

Instead of discarding the records, we upcycle!


1. Preheat an oven to 120 degrees celcius
2. Place the record on top of a metal colander
3. Carefully place the metal colander and record on a baking tray in the oven
4. After five minutes the record will have moulded over the colander 

In oven 

5. Remove the colander and record from the oven
at this stage the record is still malleable for about a minute so do any fine tuning of shape
6. Then place in room temperature (still on colander) to set 
Cooling down
7. Remove it from the colander and you have a record bowl!


The upcycled record as a stash bowl!


.............................................................................................................. Please visit me on etsy! www.etsy.com/shop/empressbat handcrafted gothic goodies at bargain prices. see me on etsy! www.etsy.com/shop/empressbat ...Please visit me on etsy! www.etsy.com/shop/empressbat handcrafted gothic goodies at bargain prices. see me on etsy! www.etsy.com/shop/empressbat

DIY: personal tissue holder

I always have tissues on my person, stuffed in my sleeves, shoved in a backpack, or littering my handbag. How much nicer would it be to have my tissues in an organised decorative especially made holder to slip into my bag? I decided to make one for myself, it took less than ten minutes, easy to make takes a teeny bit of fabric, and can be made different ones to match your bag, your stationery, your décor! 

They are so quick to make you could make heaps and give them as gifts or use them to sell at fund raisers and fêtes. If you don’t sew.... and here is a plug for my store... i make these and sell them in my etsy store and via my facebook page and am happy to take custom orders.

Here is how to make a tissue holder for your tissue stash!

Cut two rectangles of fabric, you can use matching or contrasting fabric whatever you want to! I used a bright yellow and orange floral print as my lining fabric, and a blue polka dotted fabric as my outer fabric.

The  rectangles need to be about 16.5 cm * 14 cm(you need to alter this according to the size of your mini tissue pack as some are larger than others!).


  • With face side in, sew all around the rectangle with about 0.5cm seam leaving 2 cm un-stitched. 
  • Turn right side around, and iron flat,. Ironing helps to keep the project neat and makes it easier to sew as there are no bubbles or creases in the fabric to mess up your straight lines!
  • Stitch around the rectangle, to close off the small opening, and to make all the sides uniform. In this example I chose a decorative stitch, however a straight stitch or hand stitching is fine as well.
  • with long sides horizontal, fold the fabric in half short sides together to provide a half way line, then unfold it, and fold the left side and right side up to the midway line. Iron and pin to make it easier to stitch.


  • Stitch across the short sides


  • Then turn the fabric the right way around, and put your small packet of tissues, or some loose tissues you have folded into the holder, and you are ready to use it!


Ideal to make for fund raisers, fêtes, or as a small gift! These tissue holders help to organise your tissues in your bag, and you could make other accessories, such as diary cover and draw string bags for makeup, in matching or coordinating fabric and have a set of items!


...................................................................................... Please visit me on etsy! www.etsy.com/shop/empressbat handcrafted gothic goodies at bargain prices. see me on etsy! www.etsy.com/shop/empressbat ...Please visit me on etsy! www.etsy.com/shop/empressbat handcrafted gothic goodies at bargain prices. see me on etsy! www.etsy.com/shop/empressbat

Setting up my Blogging planner in my Kikki K Gold A5


Hello Batlings!

I hope your 2015 is looking really lovely! I have settled back into work, and into my studies and my home hobby business for the year and it feels like I had never had a holiday!

Today's post is about my new Kikki K gold planner and how I set it up to keep myself organised with my two blogs! Empress Bat's Journal (this blog) and Apothecary Greens (my blog about herbalism and alternative therapies).  If you are interested in my other planner related posts and my free printables, please have a look at the page where I have put all my planner related post links.

Note, I have not yet 'prettied' up the planner as I have only just set it up! I will do an update to this post once it is all pretty with stickers and washi and doodles!!

Personalise planners to work for you!

Remember using planners, binders, notebooks, diaries, and sticky notes, is all about what works for you! So work out a system that makes sense and that you know you can use to be more productive, less stressed, and organised!

I use multiple 'planner binders', but they are not all used as diaries/calendars.  They are used as conveniently sized project binders, each has a different use, and each works well for me, with my diary as the 'hub' of operations!


Blog Planner Set Up

1. I took everything out of the Kikki K planner, I sold the refill papers to another planner fan, and started to sort the A5 ring binder in the manner that makes sense to me. 


gutted the Kikki K planner

2. On some scrap paper I worked out what I needed in a blog planner book. I ended up with needing seven sections: schedule, information, blog 1, blog2, to do, inspiration, and tools.
Happily the Kikki K planner came with seven dividers, I just need to change the tab titles!

3. With my trusty Dymo Labeller, I made labels on some cool silver metallic tape.  Then as I was telling myself how cool the labels looked, I realised I had made them too big...so I altered the font to small and tried again!!


Making my own tab labels
Newly labelled dividers back in the planner

3. For the SCHEDULE section, I used the Kikki K month to two pages, I will write in the boxes when i need to draft a post or load up a post and other important blog type things i need to know dates of.
For Apothecary Green is use a green pen, and for this Empress Bat's Journal I use a purple pen. (my colour key is on the right hand side of the page)

4. Using some file cards in large size, i punched holes in them to fit in my planner, and wrote my sites and what they are on them. Example '' @empressbat | twitter | social media"

These cards will be in my 'Information' section, as they contain the sites I use for blogging and social media, and any guest bloggers and their blogs. Basically handy information I can get at a glance!


file cards to use in my planner
5. the next two sections are called Blog One and Blog Two and are for Empress Bat's Journal and Apothecary Greens respectively. In this section I use note paper with holes punched in the sides.  My brain dump for my blogs goes in these two sections. Blog ideas, what aims I have for each blog or post, how to increase my audience, drafts of future posts, all that kind of stuff!

6. To Do: the to do section has things I need to get done, a memo section of things i need to do, for example: contact my guest blogger..hint hint Madame Monstrous of Zentangle Creations, and fix up my templates... notes of things that once done can be discarded.

7. Inspiration: In this section I have pages with pockets, I stash magazine pages, and stickers and all sorts of items that inspire me for my blog posts! I also have printouts of information I may wish to refer to later when composing a blog.

I make the pages with card stock and washi tape to create pockets.


one of my pages with pockets! Some inspiration cards are in this pocket


8. Tools: this has pages about how to make a blog sparkle (like the Blog Ready Challenge by Raine of Lime Tree Fruits); as well as information on search engine optimisation, and HTML and CSS for formatting websites.

9. Page Lifter: I used two pieces of metallic gold card, cut to A5 size, and washi taped together, to create a page lifter for the back of my planner pages, to stop my pages curling up when I shut the binder.  The card stock was doubled to ensure it is thick and heavy, and I made the holes larger than normal so it can move freely in the binder. This helps it to act effectively as a page lifter.
Page lifters stop your pages getting all curled up when you close your binder! They are easy to make form stiff card stock, make sure you make the holes for the rings larger than usual so the page can move freely.


>>>>>>>>>>>>>>>>>>>>>>>>>>>>>>>>>>>>>>>>


Steampunk-Goth DIY supplies on the cheap

Still on my Steampunk meets Goth jewellery creating theme of last week, which you can read about here, I decided to look around the house, the grocery store, and the hardware store to see what could be used to create original Steampunk-Goth pieces without costing a heap of cash, and without being mass produced jewellery components.

'Found items' from the house

To start with, anyone who knows me knows that I am into technology and work daily with computers, so it won't be a surprise to know I have quite a stash of old memory cards, old phones, wires and assorted computer bits and pieces including circuit boards lying around the house. These have been piled together and are ready for me to create with. Not only is this recycling it is also a cheap supply of jewellery components, as otherwise all these bits would have ended up in landfill!

Hardware Store

Oh my I have found Aladdin's cave! Here for purchase I find cheap copper wire, washers, nuts and bolts, soft metal tubing, industrial strength glue, and all manner of things that I can turn to good use for minimal cost!

My favourite find is these elbow shaped copper capillary joins that were in the plumbing section. (they are small and will be good to thread necklaces through as a kind of pendant bail)


Grocery Store

At the grocery store where I was purchasing potatoes to go with the salmon I am cooking for my husband tonight, I found these beer bottle caps. They are an antique gold tone, were super cheap for a massive bag, and I can think of heaps of ways I can use them to make jewellery!
Very happy with my stash, I can't wait to see what I can create with it! Stay tuned to future blog posts to see my creations.

What bargain finds do you have for your jewellery making?

______________________________________________________________________________ 

About Me: I work full time, I am also studying for a therapist qualification in Naturopathy specialising in Herbalism, I have a small craft 'business', I am co-admin of an auction page on facebook to help other small hobby businesses, i maintain my own 'store' facebook page, I blog at least once a week and I maintain a facebook page created to support small home businesses and hobby sellers 
............................................................................................................... ............................................................................................................... Please visit me on etsy! www.etsy.com/shop/empressbat handcrafted gothic goodies at bargain prices. see me on etsy! www.etsy.com/shop/empressbat ...Please visit me on etsy! www.etsy.com/shop/empressbat handcrafted gothic goodies at bargain prices. see me on etsy! www.etsy.com/shop/empressbat

Steampunk musings


I just watched the last ever episode of WAREHOUSE 13, the steampunk, sci fi, fantasy, crime solving, adventure series from America. I was most vexed when I found out the show was no longer going to be made.

As well as the entertaining plots, the humourous dialogue, and the quasi historical artefacts, I really liked the steam punk feel of the show. The modern technology meets scrolls and filigree of Victorian bronze art... love it!

Steampunk is basically a fantasy sub culture of an alternate industrial revolution, where Victoriana with its flounces and fantasy art meets technology.

Two Steampunk artists and makers of jewellery I admire are Sassy Steampunk and Mad Scientist Designs.  I own several of Sassy Steampunk's creations and have just ordered a steampunk bracelet cuff from Mad Scientist Designs.

Both these talented ladies own etsy stores and sell not only their one of a kind steampunk creations but steampunk supplies to DIY steampunk accessories!

Anyway I started thinking about steampunk jewellery offered on ebay, and how some of it seems to lack the grand flourishes of the style, seems to be not really understanding the origins of the art form and seems really rather cobbled together rubbish, although it features many a fuse or transistor. So I have been working on my own pieces.

I think I may venture more into creating steampunk designs as I am really enjoying the geeky creativity it inspires!

Below are some of the pendants I have made, they are a bit Goth meets Streampunk, and not solely steampunk.

Steampunk owl pendant

Steampunk absinthe faery pendant
Steampunk-Goth cameo pendant
Have you seen my Steampunk Meets Goth Pinterest board?


__________________________________________________________________________ 

About Me: I work full time, I am also studying for a therapist qualification in Naturopathy specialising in Herbalism, I have a small craft 'business', I am co-admin of an auction page on facebook to help other small hobby businesses, i maintain my own 'store' facebook page, I blog at least once a week and I maintain a facebook page created to support small home businesses and hobby sellers 
............................................................................................................... ............................................................................................................... Please visit me on etsy! www.etsy.com/shop/empressbat handcrafted gothic goodies at bargain prices. see me on etsy! www.etsy.com/shop/empressbat ...Please visit me on etsy! www.etsy.com/shop/empressbat handcrafted gothic goodies at bargain prices. see me on etsy! www.etsy.com/shop/empressbat

DIY: crochet snowflakes

It is heading for Winter here, and although winters where I live never get much colder than -1 degrees celcius, and some morning frost, I decided to be creative with a winter theme.

cue crochet snowflakes
I made this one in cream coloured 8ply acrylic
I learned how to crochet when I was very young, around 3 or 4 years old, and I find it quite easy to do. The trouble is I am not that good with understanding crochet patterns, I always find them convoluted and complex. I find it easier to make stuff up as I go along, or revise a pre-written pattern into one that works for me.

I have been fiddling around with an easy to make crochet snowflake, after success making one out of variegated blue 8ply acrylic yarn I thought I would share it with all of you! 

what i did:
using a 3.5 hook and 8ply yarn chain 6 and slip stitch to join
chain 4, then treble 11 into the hole
slip stitch the end of the row of trebles to the start

  • *chain 5, then double crochet (dc) in the 4th chain from hook
  • chain 5, dc in the 4th chain from hook
  • then dc again near the top of the trebles
  • and one more dc in the next treble*

repeat from * 5 more times

then slip stitch to finish, darn in edges

et voila

if you use sparkly yarn it will look even nicer!

this one was made in variegated blue 8ply acrylic


______________________________________________________________________________ 

About Me: I work full time, I am also studying for a therapist qualification in Naturopathy specialising in Herbalism, I have a small craft 'business', I am co-admin of an auction page on facebook to help other small hobby businesses, i maintain my own 'store' facebook page, I blog at least once a week and I maintain a facebook page created to support small home businesses and hobby sellers 
............................................................................................................... ............................................................................................................... Please visit me on etsy! www.etsy.com/shop/empressbat handcrafted gothic goodies at bargain prices. see me on etsy! www.etsy.com/shop/empressbat ...Please visit me on etsy! www.etsy.com/shop/empressbat handcrafted gothic goodies at bargain prices. see me on etsy! www.etsy.com/shop/empressbat

DIY: air freshener

Have a look at a post on my other blog about my DIY air freshener made from roses and herbs from my garden!


______________________________________________________________________________ 

About Me: I work full time, I am also studying for a therapist qualification in Naturopathy specialising in Herbalism, I have a small craft 'business', I am co-admin of an auction page on facebook to help other small hobby businesses, i maintain my own 'store' facebook page, I blog at least once a week and I maintain a facebook page created to support small home businesses and hobby sellers 
............................................................................................................... ............................................................................................................... Please visit me on etsy! www.etsy.com/shop/empressbat handcrafted gothic goodies at bargain prices. see me on etsy! www.etsy.com/shop/empressbat ...Please visit me on etsy! www.etsy.com/shop/empressbat handcrafted gothic goodies at bargain prices. see me on etsy! www.etsy.com/shop/empressbat

Desk Disaster: Part Four of the 'Organise and Beautify' saga

My desk is a mess... a real disaster!  I cannot find anything.. I am a computer nerd so there are many USB drives, external hard drives, cables... I am artistic so there are pencils and pens everywhere.. I read a lot so there are books... I am studying so I have notes .....there is stuff everywhere.

I just tidied my desk... spot the difference??

DESK: BEFORE


DESK AFTER


______________________________________________________________________________ 

About Me: I work full time, I am also studying for a therapist qualification in Naturopathy specialising in Herbalism, I have a small craft 'business', I am co-admin of an auction page on facebook to help other small hobby businesses, i maintain my own 'store' facebook page, I blog at least once a week and I maintain a facebook page created to support small home businesses and hobby sellers 
............................................................................................................... ............................................................................................................... Please visit me on etsy! www.etsy.com/shop/empressbat handcrafted gothic goodies at bargain prices. see me on etsy! www.etsy.com/shop/empressbat ...Please visit me on etsy! www.etsy.com/shop/empressbat handcrafted gothic goodies at bargain prices. see me on etsy! www.etsy.com/shop/empressbat

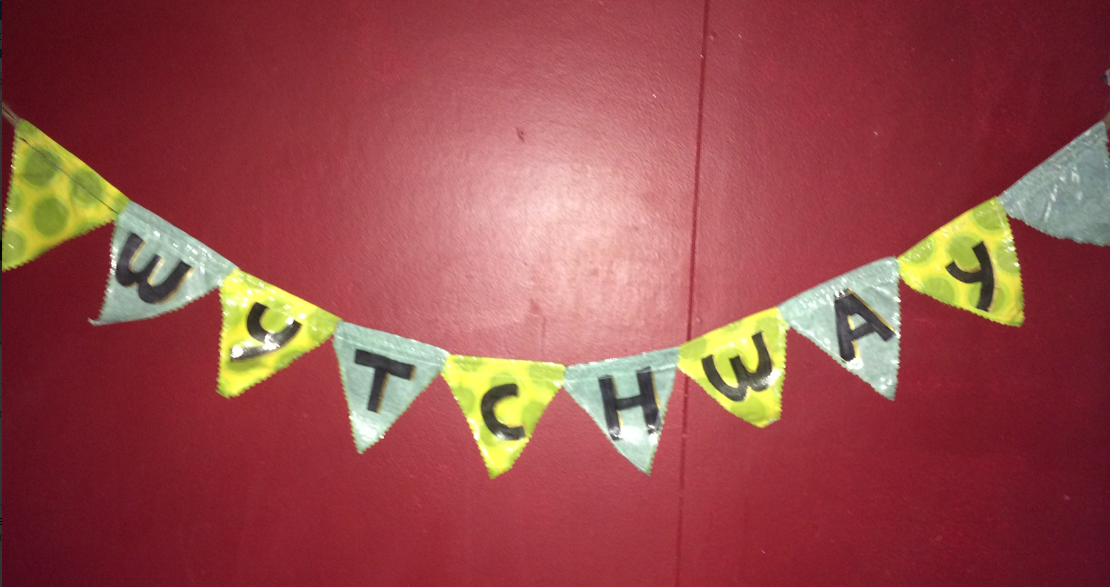
DIY: Easy Fabric Bunting

A few days ago, a friend of mine who has a market stall called Wytchway  was asking on facebook about where she could buy some waterproof fabric bunting to decorate her stall. 

If you are in the Dayboro Queensland area and interested in Wytchway's stall or to purchase from her online please have a look at the information on her facebook page.


I decided to attempt to make some bunting.
Just to see if I could.

Step 1

Created a template out of cardboard for the size and shape I wanted, allowing for the hem (to feed the string through)
cardboard template

Step 2

Drew around the template on the fabric and then hand lettered the 'WYTCHWAY' with a fabric ink pen

Step 3

Ironed fabric and then placed the clear fabric plastic coat stuff on it, covered it with baking paper and ironed on a low setting

Step 4

I cut out the triangles with sharp pinking shears (keeping my fingers well out of the way for fear I would end up with pinking shaped abrasions on my hands!)

I then sewed around them and sewed the hem in which the jute would go to string the bunting

Step 5

After each triangle was sewn I then threaded them with the jute to form the bunting. After all triangles were on the jute I pushed them closer together and did a zig zag stictch over the hems and the inserted jute.

I then went over each letter adding embellishment in the form of gold paint pen shading. (yes I AM ambidextrous which is why the top photo shows me writing with my right hand and this photo is my left hand)


The bunting is ready to hang!

My sewing machine is old and falling apart, i cant afford a new one at the moment, so it kept breaking the cotton. I think if my sewing machine worked properly i could have made this bunting so much faster, and with less expletives.

Remember this one is only a prototype. So excuse it looking a bit dodgy!

I think these could be improved if a stiffener was used such as stitching the triangles onto acrylic felt, or ironing interface on the back.

VERDICT: easy to make, so give it a go!


For teeny bunting, use washi tape and twine!
____________________ 

About Me: I work full time, I am also studying for a therapist qualification in Naturopathy specialising in Herbalism, I have a small craft 'business', I am co-admin of an auction page on facebook to help other small hobby businesses, i maintain my own 'store' facebook page, I blog at least once a week and I maintain a facebook page created to support small home businesses and hobby sellers 
............................................................................................................... ............................................................................................................... Please visit me on etsy! www.etsy.com/shop/empressbat handcrafted gothic goodies at bargain prices. see me on etsy! www.etsy.com/shop/empressbat ...Please visit me on etsy! www.etsy.com/shop/empressbat handcrafted gothic goodies at bargain prices. see me on etsy! www.etsy.com/shop/empressbat

REVIEW: Chiyogami Designs washi tape

My third review for the year! I will only review stores that I have personally used and vouch for, and I prefer to review small home businesses as these are the ones that need the most exposure.To recap on this year's reviews, I posted two in February: one about Galaxy Aromatherapy and the other about Beaded Webs

Today's review is about a favourite washi tape supplier, one that I purchase from frequently, Chiyogami Designs.

  
If you have been reading my blog of late Batlings, you will notice my obsession with washi tape. I use it in my filofax, on pegs to decorate them , and even  on pendant blanks to create trendy costume jewellery. I love washi tape so much I even have a board about it on Pinterest!

So as washi tape doesnt grow on trees..( actually its usually made from rice paper, so its more likely to be growing in .. er.. rice paddies..??), I needed to find a store that sells a good range of high quality washi tape at affordable prices. I was so happy when I discovered Chiyogami Designs as they are that store!

Chiyogami Designs sells from an ebay store, the store has an amazing range of washi tape that is added to regularly. Each time I visit their ebay store page I find more washi tape delights. They also have a facebook page, if you are a fan of washi tape make sure you like their page, as new items in their ebay store are often featured there, you will get the scoop on their new listings as a fan of their page!


The tape is always reasonably priced, good quality, a wide range to choose from, packaged well, and sent fast. The store owner is friendly and reliable , and is also a DIY crafts person type. What more would you want in a washi tape supplier I ask?

Some of my favourite washi tapes so far from this store are:
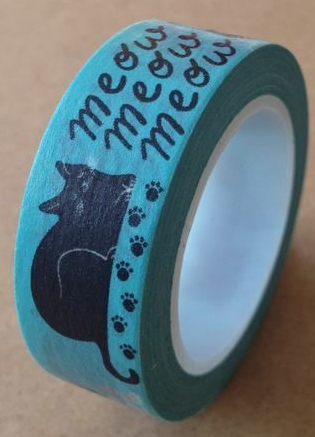
You may recognise this cat themed tape
 from the pendants I made?
I use this tape in my filofax on all my herbalist notes
for the qualification I am studying!
Purple trio of tape!

If you like washi tape as much as I do, please check out this Australian based store, for affordable, quality, and large variety of washi tape!


______________________________________________________________________________ 

About Me: I work full time, I am also studying for a therapist qualification in Naturopathy specialising in Herbalism, I have a small craft 'business', I am co-admin of an auction page on facebook to help other small hobby businesses, i maintain my own 'store' facebook page, I blog at least once a week and I maintain a facebook page created to support small home businesses and hobby sellers 
............................................................................................................... ............................................................................................................... Please visit me on etsy! www.etsy.com/shop/empressbat handcrafted gothic goodies at bargain prices. see me on etsy! www.etsy.com/shop/empressbat ...Please visit me on etsy! www.etsy.com/shop/empressbat handcrafted gothic goodies at bargain prices. see me on etsy! www.etsy.com/shop/empressbat

Washi Tape Wonders: things to make with washi tape

I really like washi tape. 

If you have read my blogpost about decorating wooden pegs, or my post about setting up my filofax you will see references to the tape and see how i have used it.

The tape comes in all sorts of colours and patterns, with a low level adhesive making it both decorative and useful.
For those yet to experience the wonders of washi tape, allow me to elucidate.

Washi tape is a type of decorative masking tape, traditionally made from rice paper, first created in Japan by the company Kamoi Kakoshi Co.Ltd. and sold as MT masking tape.  It dates back to 2006 when a group of artists approached the company with an art journal featuring illustrations created from masking tape.

Many companies make and sell versions of the original MT masking tape, and it is generically referred to as Washi Tape.

There are so many designs of washi tape to chose from; patterns, pictures, and solid colours in matte or metallic finishes.

The tape has a less sticky adhesive just like masking tape, so it is easy to remove if you have made an error in placement, or if you only want it stuck temporarily; the adhesive is however still strong enough to stay put on paper, envelopes, diaries, and all manner of things if you wish it to be a permanent decoration!

I use it as a temporary label on the plastic freezer containers I store left overs in. I stick a piece of washi tape on the lid and write a description of the container's contents on there. The washi tape remains on the lids in the freezer and only comes off when I peel it off prior to washing the containers up.


Tonight I just received a bulk order of Washi tape, and am experimenting with using it on metal pendant blanks to create novel pendants for costume jewellery. I will write about that in another day's post. Here is a sneak peak at a few I am working on. Two are using a cat themed washi tape from Chiyogami Designs, and the other is a postmark/letter themed washi tape I picked up a few years ago.
pendants with washi tape 
pendants with washi tape

I use washi tape in my filofax, on pegs to decorate them, and as I mentioned , I am also trying out what washi tape will look like on a pendant. It is great in scrapbooks and the less formal Smash books, as well as pretty on packages to decorate a gift!

I have a lot of washi tape but it isn't wasted, I use it for so many things!
some of my washi tape

There are so many uses for washi tape, I am still finding uses for it, and find it such a versatile craft supply.

In case you are looking for some lovely washi tape designs at very low prices, I buy most of my washi tape from Chiyogami Designs , they have an ebay store and I have always found them to be reliable and honest sellers, with an amazingly diverse range of washi tape as well as Japanese print origami paper.

Do you use washi tape?
What do you use it for?
Please feel free to comment.


____________________________________________________________________________ 

About Me: I work full time, I am also studying for a therapist qualification in Naturopathy specialising in Herbalism, I have a small craft 'business', I am co-admin of an auction page on facebook to help other small hobby businesses, i maintain my own 'store' facebook page, I blog at least once a week and I maintain a facebook page created to support small home businesses and hobby sellers 
............................................................................................................... ............................................................................................................... Please visit me on etsy! www.etsy.com/shop/empressbat handcrafted gothic goodies at bargain prices. see me on etsy! www.etsy.com/shop/empressbat ...Please visit me on etsy! www.etsy.com/shop/empressbat handcrafted gothic goodies at bargain prices. see me on etsy! www.etsy.com/shop/empressbat

Pegs as creative storage solutions: Part Four of the 'Organise and Beautify' saga

In my constant struggle to declutter and keep myself and the house organised, I have decided to be creative with storage. It is more a MUST do, rather than a 'oooh isn't this creative lets do it', due to the lack of spare cash in the household! 

The house is small, we need to use the walls as much as possible to stash things. Cash is limited so we need to use what we have to create a storage solution.

As I have been decluttering the house I noticed so many paper bits: receipts, bills to attend to, memos... lots of bits of paper that may not need long term storage but need to be in the forefront of my consciousness until they are actioned. 

I decided they could be stored on the walls, with clothes pegs. I haven't gone completely insane..yet.. my batlings, stay with me on this.

All i needed was a long piece of picture wire, some nice hooks, and some pegs. I have all those things so no need to buy anything extra here. 

The pegs looked a bit hohum, and as you know I do not like drab and dull.  I looked at my box of washi tape and knew just how to decorate those wooden clothes pegs!

wooden clothes pegs and washi tape, what a great idea!

Covered in washi tape pegs are useful and decorativet!


In case you are looking for some lovely washi tape designs at very low prices, I buy most of my washi tape from Chiyogami Designs , they have an ebay store and I have always found them to be reliable and honest sellers, with an amazingly diverse range of washi tape as well as Japanese print origami paper.

After covering the pegs with washi tape, I then put some small brass hooks into the wall, (you could also use removable adhesive ones if you are renting) and attached picture wire, the wire is taut so it can handle weight of the paper without sagging.


Finished storage solution: I can even put my spare fountain pen ink there!
You may have noticed I have a lot of washi tape, and as I said before most of my beautiful washi tapes come from Chiyogami Designs. Where do I store these?
On a trouser hanger of course!

Decorative tape stored on a trouser hanger
I would love to hear your creative storage ideas for organising and decluttering, please feel free to let me know them in the comments!


______________________________________________________________________________ 

About Me: I work full time, I am also studying for a therapist qualification in Naturopathy specialising in Herbalism, I have a small craft 'business', I am co-admin of an auction page on facebook to help other small hobby businesses, i maintain my own 'store' facebook page, I blog at least once a week and I maintain a facebook page created to support small home businesses and hobby sellers 
............................................................................................................... ............................................................................................................... Please visit me on etsy! www.etsy.com/shop/empressbat handcrafted gothic goodies at bargain prices. see me on etsy! www.etsy.com/shop/empressbat ...Please visit me on etsy! www.etsy.com/shop/empressbat handcrafted gothic goodies at bargain prices. see me on etsy! www.etsy.com/shop/empressbat